What to Do With Scraps of Felt, Part VII: Make a Festive Garland

I confess: I have a thing for dangly art. I like making it, and I like looking at it. I like the variously gentle and energetic movement in the free-hanging kind, and I like the potential variability of the of the attached-to-something-but-not stationary kind.
In terms of design elements, I also like simple shapes and bold colors. These proclivities lend themselves well to the scraps-of-felt project---number seven in the series, by the by---that I present to you today. I think it's kind of fun and I hope you do too. Yay!
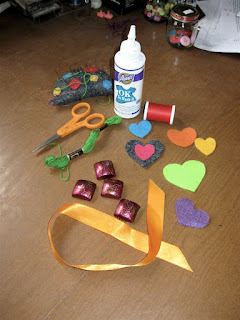
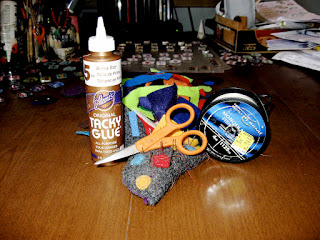
Materials


  • Scraps of felt
  • Straight pins
  • Scissors
  • Glue
  • Four-pound fishing line
  • A large jingle bell or other decorative doo-dad with a little weight to it (optional)

Steps

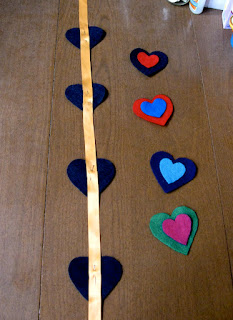
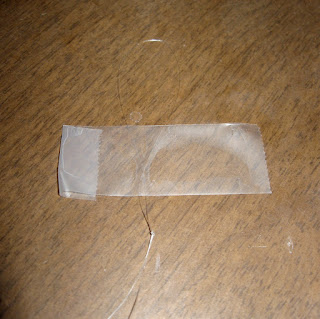
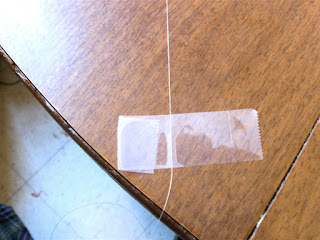
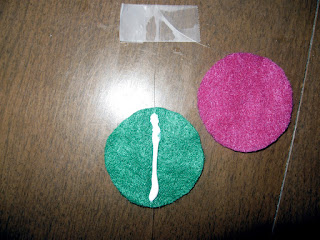
Cut a length of fishing line and tie a loop in one end. With a small piece of tape (fold one end over sticky sides together aid removal) secure that end to a table or the like.

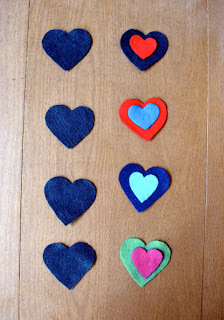
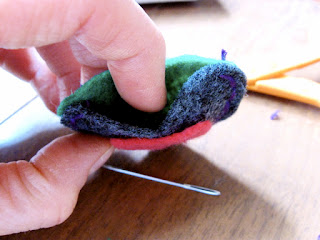
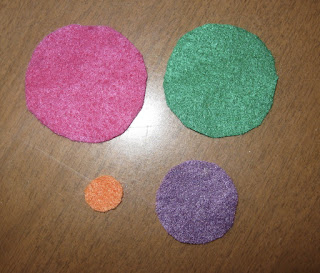
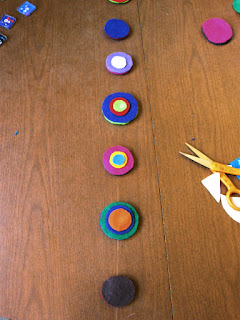
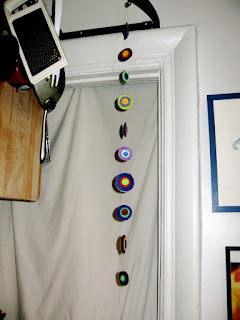
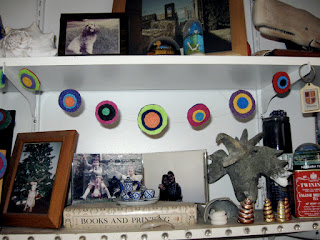
Cut shapes from scraps of felt. I like to stack shapes on top of each other for a dimensional look so I cut several different sizes of shapes. 

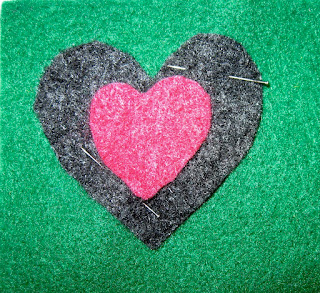
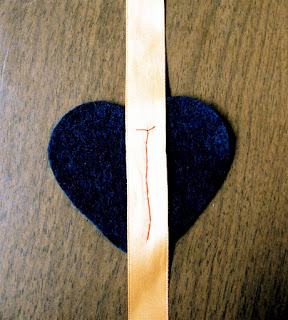
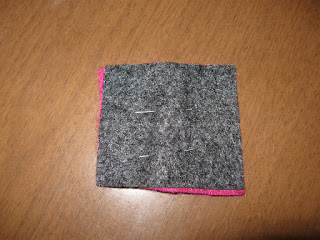
Regardless of whether you decide to stack or not, start by cutting shapes of the same size to sandwich the fishing line between. Pin two pieces of felt together with their back (less fuzzy) sides facing each other and snip away.

Separate your pieces. Apply a line of glue to the back side of one of the shapes and align it with the fishing line. Set the line in the glue. Affix the other shape, fuzzy side up, to the first shape. Gently press together. 

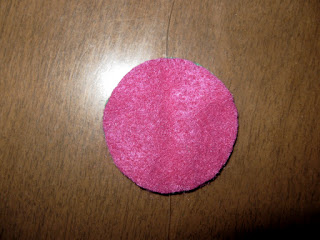
Glue smaller shapes to the base shapes until you're happy with the result. Do this to both sides or just on one, depending on how you intend to display the result (if against the wall, one side; if free-hanging, both sides).

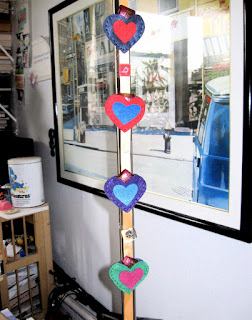
Display suggestions and tips: If you're going to hang your work vertically, say, in a doorway, tie a jingle bell or similarly weighted object to the loose end to stabilize it a bit. 

If you're going to hang your work horizontally, more akin to a garland, skip the jingle bell in favor of another loop. 

And there you go---a festive garland for everyday or party use. Enjoy!

Until next time,


Linda

Warm Fuzzy Valentine

Here's a quick little Valentine's decoration with a twist: It holds chocolate!


Materials
  1. Felt
  2. Fabric glue
  3. Needle and thread
  4. Embroidery floss
  5. Pins
  6. Scissors
  7. Ribbon
  8. Chocolate!
Steps
Cut heart shapes out of felt. I cut two sizes, one for the front sides of the pockets that will hold the chocolate, to decorate the pockets with. Glue (or sew, if you prefer) the smaller decorative hearts to the larger (pocket) hearts (you can also do this second step later; I just happened to do it at this point).


Pin large hearts onto another piece of felt and cut around it to create the back sides of the pockets.


Set front sides of pockets aside and lay the back sides out in a line. 


Measure out a piece of ribbon and position lay it on top of your row of pocket-backs. Pin in place


Sew (or glue, if you prefer) the ribbon to the pocket-backs.


Pin the front sides of the pockets to their corresponding backs. Using embroidery floss, sew most of the way around, leaving the top open (pic below is out of sequence).

Fill the pockets with chocolate and hang (use push-pins, magnets, or sew a ring to the top of the ribbon -- I used magnets to attach my chocolate-pocket heart garland to a lamp).

Happy Valentine's Day!

Linda
Purty Bird

How-To: Recycle Junk Mail into Paper Beads

bead tutorial, header

With just a few pieces of basic equipment, you can turn your boring old junk mail into cute paper beads! These lightweight, bulky beads are great for making fun chunky jewelry, festive garlands, or a bead curtain to hang in your doorway (if you're feeling ambitious!)


Equipment:

- Kitchen blender
- 2 Buckets
- Large bowl or tub
- Sieve
- Awl
- Cutting mat
- PVA (white) glue
- Acrylic gesso
- Acrylic paints
- Clear varnish
- Paintbrushes
- Paper for recycling.

For this tutorial, I loosely packed a 1-gallon bucket about 3/4 full with scraps, which yielded around 100 beads ranging in size from 1/2"-1".

Ideal papers to use: anything printed on standard office paper, business envelopes, take-out menus with a matte finish, kraft paper.

Papers to avoid: glossy or coated papers such as magazine pages, waxed paper, newspapers and phonebooks (the ink is very messy and gross), facial tissue, paper towels.

NOTE: I recommend that you have dedicated equipment for home recycling/papermaking, rather than use the same items you use for food preparation. A good, used blender can easily be found at a thrift shop or yard sale. My rule is: if I use it for papermaking, I don't use it for food.

beadtutorial 1


STEP 1: Tear paper into 1" scraps. Make sure you remove any staples and all plastic windows from business envelopes. Place torn scraps in a bucket, fill with water, and let it soak overnight.

STEP 2: Now it's time to make pulp! Put a couple of handfuls of paper into the blender and fill blender about half-full with water. Blend until the paper has the consistency of oatmeal, about 10 seconds. Place sieve over second bucket, and empty blender into sieve. After the pulp in the sieve has drained a bit, manually squeeze out excess water before transferring pulp to large bowl or tub. Repeat this step until all your scraps have been pulped, drained, and squeezed.

STEP 3: Add a nice big dollop of white glue to the pulp, mixing it in with your hands.

STEP 4: Roll yourself some beads! Take a bit of pulp and roll it into a little ball between your palms. This is the tricky part. If the pulp has too much water in it, it won't hold together. If it has too little water, it will be too crumbly to hold together, and your beads will break apart. Try rolling a couple beads and see how it goes. If the pulp is too wet to hold together, squeeze out more water. If the pulp is too crumbly, add back a little more water and some glue. You'll soon get a feel for the proper consistency, and it's easy to make little adjustments as you go. When in doubt, add more glue!

beadtutorial 2


Once you've formed all your pulp into little balls, let them sit in a nice, out-of-the-way spot until they are dry as a bone.

STEP 5: Put holes in your beads with an awl. Working on a cutting mat to protect your work surface, hold the bead steady between your thumb and forefinger and press the awl slowly and firmly straight down through the bead.

STEP 6: I like to prime my beads with a nice thick coat of undiluted gesso because it helps to smooth over the rough surface. This step isn't absolutely necessary, and you can go straight to decorating your beads with paint, if you want.

STEP 7: Grab your paints and brushes and go nuts!

STEP 8: When the paint is dry, you can brush on a coat of clear varnish to give your new beads a little added protection and shine.
beadtutorial 3