No-sew Upcycled Tee Shirt

BoxyToBraided

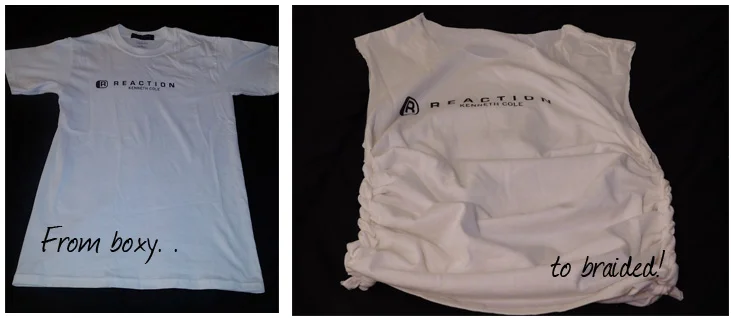
Happy Earth Day All! To help you celebrate the holiday and being green throughout the year, I'm sharing a technique that lets you reuse old t-shirts that you can't seem to let go of, yet never wear. This also helps you reduce your material waste and upcycle instead of recycling without needle, thread, or a sewing machine! 

Before we start, grab one (or a few) t-shirt(s) from your drawer or closet  and get ready to breathe new life into your wardrobe. 

All you need for this project is:

  1. A tee shirt 
  2. A pair of sharp scissors
  3. More tee shirts, because you're going to want to do it again!

1. Start by laying your shirt flat, and cutting off the sleeves and collar. You can choose a V-neck, or cut the sleeves a little more if you like a skinnier tank-top strap.  

2. Next cut ten to fifteen horizontal two inch slits down each side of the shirt. Less cuts will give you a chunkier braid; more will result in a finer braid. I settled on eleven since this was not a very long tee.    

3. Now it's time to braid! Reach down into the loop created by your first cut.  

4. and pull the next loop up through the hole. If your loops are a little wide like mine, push the next loop up a little until you can grab it. 

5. Repeat with your remaining loops until you reach the bottom. You will see the braid start to take shape. If you aren't satisfied with the width, shake out your loops and cut more slits. Get creative! Make It your own!

6. When you reach the very bottom of your shirt, cut the last loop in half right at the seam. 

7. Pull the front tab of the last loop through your chain and tie it to the back tab. 

8. Done! Rock your flirty-cute, faux crochet-sided top! 

Post by Coleen Phoenixx

Etsy ° Instagram ° Facebook 


Sewing Tutorial: Rope Bowls

A few weeks ago I wrote about a homey trend that is pretty easy to make, baskets and bowls made of rope.  You can read about it here.  Today I am going to share with you how to make these easy, heirloom bowls.

Materials: for this project I used cotton clothesline rope bought at my local hardware store, Pintchiks. 

*sewing machine

*thread - I used Gutterman brand in natural, yellow and violet

note - the thicker the rope, the faster the bowl will be made.

1. Form a circle by shaping the rope on a flat surface. I started doing this in the air which presented a challenge. When the bowl is about 2" to 3" wide I sew a zig zag stitch across the center in one direction, and then repeat in a second direction.  I set the zig zag on a width of 5 to 6 and a length of 1 to 2.  For the base I use natural color thread. Important note, make sure the rope is feeding from the ground or your lap and moving counter clockwise. 

2.  I took the base out and changed my top thread to a bright canary yellow.  Once the bowl base is my desired size I start to hold the base at a 90 degree angle and continue to feed the rope.  

step 3.

3.  About 2" up the bowl I switched my bobbin thread to a violet purple. This creates a pretty contrast to the canary yellow on the inside.  Once the bowl starts to shape it's easier to hold it with the left hand and feed the new rope with the right hand.

4. Creating the handle. Once you start to reach the end of your rope, take a few inches and curve the handle. At the beginning of the curve sew a backstitch a few times so the handle is secure.  At the end of the handle, repeat, but put the end of the rope on top of the edge.

step 4

These bowls are so easy to make, you can eventually make them larger into baskets and planters.  Experiment with nylon and polyester rope, hot pinks and green jute are next on my list. Perfect for bread, fruit, jewelry, hair ties. The uses are endless! Enjoy!

Tracey

www.traceytoole.com

www.traceytoole.etsy.com


Tutorial: DIY Apple Picking Canvas Tote

Apple picking time is here! Crisp fall leaves, fall foliage trips, pumpkin picking.  I think autumn might be my favorite time of the year! I love picking apples and pumpkins and I am so happy to pass this tradition on to my daughter.  It's something kids and adults can do. Apples after being accumulated can get heavy.  So you want to use a tote that is durable.  For this tutorial I am using an organic duck canvas lined with a quilting weight cotton.  This is a beginning intermediate level sewing project.  Good for someone who has learned to sew and wants to do a new project and learning a few new techniques!

Materials clockwise from top: rotary cutter, omni-grid ruler, seam gauge, thread, fabric, webbing

Materials:

3/4 yard canvas

3/4 yard cotton quilting weight

2 yards cotton webbing 1 1/2" wide

matching thread , 2 yards cotton webbing 1" to 1.5" wide, iron, sewing machine

STEPS:

1.     Cut out your shell and lining pieces, cut out your pocket.  

  • Shell- cut 1 piece 38” x15”
  • Lining -  cut 1 piece 36” x 15”      
  •  Pocket – cut from the lining fabric 9” x 8”   
  • Straps – cut 2 pieces of the webbing 34” each, these straps are long. If you want them shorter, take a few inches off

2.  Make the pocket: if your print is non-directional, choose a longer side of the pocket piece, this will be the top.  Fold over ½” and press, repeat.  Sew an edge stich along this fold. For the remaining 3 sides, fold over each raw edge ½”  to the wrong side of the fabric and press.

3.     Sew the pocket onto the lining piece.  Take one of your lining pieces and measure 4” from the top. Center the pocket with the wrong side of the pocket facing the right side of the lining fabric. See photo. So both “right sides” of the fabric are facing you.


4.     Pin in place and sew with an edge stitch on 3 sides, not the pocket opening.  Be sure to back tack a few times at the top two corners.  These are stress points.

Edge stitch 3 sides of the pocket.

5. Ok now to attach the straps. Measure in 3" from where a side seam will be and place the webbing.  Fold over the top edge of the bag 1/2"  to cover the webbing, fold over again 1". Pin.

6.  Take this webbing and smoothly run it over to the point 3" from the side.  You are on the same side of the bag. Be sure to not twist the handle. Repeat step of pinning. Repeat these steps for the opposite side of the bag and other handle.

7.  Sew down the handles all along the top of the tote.  To hold all those apples you will sew 2 rows of stitching around the tote top edges and sew a reinforcement X where the handles are. 

8.    Now it's time to sew the lining to the shell, French Seam style! Lay the lining to the shell wrong side to wrong side.   Sew ½” seam allowance, trim down to 1/8”, fold over the seam face to face and sew ½” seam allowance.  Your seam on the inside of the bag should be covered.  Repeat on other side.

french seam, cut the seam down to 1/8"

inside view of French Seam

Finished! Ready to go apple picking or take a trip to your local farmer's market!

Enjoy the beautiful autumn!

Tracey Toole |  www traceytoole.com |   www.etsy.com/shop/traceytoole